Showing posts with label nursery. Show all posts

Thursday, February 26, 2015

Lexie's Nursery

 Well...it is finally finished! 
Yes, it took me longer than I had hoped...
but I am so happy with how everything turned out.
So...here is Lexie's nursery...


Here is a closer look at her crib. You might remember from an earlier post that I fell in love with her bumper, only to find out that Pottery Barn had discontinued it...but then was GIVEN one from a mom who had used it in her daughter's room. 


I absolutely love all of the colors in it! 
I added the large, pink, satin bows.


I am in love with the monogram...which I got a great deal on from Groopdealz.
If you don't get their daily e-mails...I highly recommend you sign up.
It came unfinished so I painted it with the same color chalk paint that I used for her dresser.


Here is a close up of the wall to the left of her crib. 
Landry painted the sweet picture of flowers to match her room.
G.G. (Chad's mom) bought the adorable...and tiny...tutu.
I can hardly wait to take a million pictures of Lexie in it. :)
Side note...
yes, it is driving me slightly crazy that the shelf has 4 hooks...
so the tutu isn't center...ugh.


Here's a look at the opposite side of the room.


The chest of drawers and dresser are mine...
from when I was a little girl.
Both were previously painted black.
I used some Annie Sloan chalk paint to refinish them...
added glass knobs and... 
voila...a brand new look!


The birdcage and Cinderella carriage both came from Hobby Lobby.
More bows will be added to the birdcage...and the carriage stores her headband collection.
I made the bow wall art...thanks to some inspiration from Pinterest.


Here is the same glider that was in Landry's room. 
You might remember that I had upholstered it for his room.
Well, I decided to take off the upholstery, slap some chalk paint on it, 
recover the cushions, and give it a new look.
Don't mind the empty picture frames...
they will soon be filled with pictures of our little girl. :)


Here is one last look at our little girl's room!
It is hard to believe that we will be meeting her in one week...
we can hardly wait!


Sunday, January 4, 2015

Project Nursery: Inspiration

My number one goal during my Winter Break was to get the nursery going...possibly finished...if not, at least to the point where if Baby Girl decides to make an early arrival...she has a place to sleep. :)
With Landry, I had the nursery done months ahead of time...so I was feeling WAY behind.

First up...bring on the PINK!!!!

Landry was so excited to help paint his sister's room.


Well...until this happened!


Still not quite sure how it happened...but it did. Believe it or not that was the only mess he made. :)
Oh...and no...he doesn't drool mud...that is hot chocolate that he spilled on his shirt before the painting began. :)

I had been pinning some nursery ideas for awhile...even before I was pregnant...and most of them were of girl rooms. Once we found out we were having a girl it was time to narrow down the plethora of ideas I had collected. Here are the two nurseries that I kept being drawn too...yes...they are completely different styles. :)


I loved the bright colors of the first one...and the eclectic accents. Being that Landry's room is orange, periwinkle, lime green, and navy blue...you can probably guess that I am a fan of color. :)
I also loved the elegance of the second one...the canopy over the crib, the monogram, the pretty light fixture.
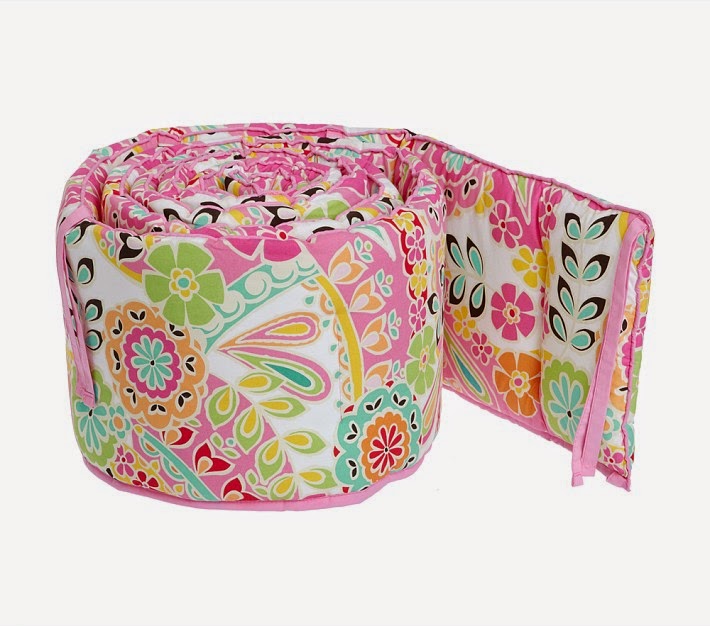
So...the hunt began for bedding that wasn't a million dollars, offered a lot of colors, and was girly without a theme. After searching all over the internet I found it!


It was on Pottery Barn...of course...and wasn't quite a million dollars...but almost. 
The real kicker...it had been discontinued!!!!
Just my luck!
So I searched e-bay...with no luck...
and decided to post it on a Facebook yardsale page...
hoping that someone might have one that they were willing to part with.
No joke...within about an hour a lady contacted me telling me she had one and would give it to me...for FREE!!!
I went ahead and added satin ribbon for the ties...because I love the big bows.


**Sorry about the lighting in the pictures...
I took these at night...with my phone...so the colors are a bit off.**

We already had a set of bedroom furniture...that was mine when I was little...so I decided to refinish those pieces instead of buying new. Two benefits of this...1. It is cheaper...duh and 2. I can get pieces that are exactly what I am looking for. An added bonus was that I had an excuse to experiment with chalk paint. :) I was so eager to get started that I didn't take any before pictures...but, to give you an idea, the pieces were black with pewter knobs. I painted her dresser a Tiffany blue color...to coordinate with the bumper...and added glass knobs. The knobs were an Amazon score...8 knobs for $12...yes, that is a really good price. :)


You might remember this chair from Landry's nursery...


Our dear friends gave it to us and I ended up upholstering it to look like this...


Well, I have taken off all of the upholstery, painted it the Tiffany Blue color, and am in the middle of recovering the cushions...to give it yet a different look. :)

Every girl has to have a chandelier...right? 
I bought this one years ago, with the intention of putting it in our master bedroom. 
Well, that never happened...so...I went ahead and painted it and now it is in her room...
and I LOVE it!


Along with a chandelier, you should know that this little girl is going to have just a "few" bows and flowers for her hair. I have seen a ton of ideas with ways to display and organize bows...but this one was my favorite!


On a recent trip to Hobby Lobby I found these two adorable bird cages that are perfect for her room. I absolutely love the one that looks like Cinderella's carriage. Now I need t get started and make some bows.


My mom got her this cute picture...


and then I found this one to match. 


Here are some other ideas I have found that I am hoping to make.
I thought this one was so cute...and simple.


And I love this quote...


and how cute is this?
I am most certain that I can recreate something 
similar for WAY less than the $47 price tag on Etsy.


I almost forgot about this cute idea for keeping all of the binkies in one place.


As you can see...a lot of progress has been made...but there is still a lot to still do.
I am feeling so much better just knowing that her crib is ready to go, walls are painted, and all that is left is finishing up the final touches...woohoo!!!

Monday, April 5, 2010

Operation Nursery: The Final Product!

Well, the nursery is done...for now that is! Here are some pictures of the final product...they show all three walls of the room...the fourth wall is the one with the window and chair...I have already posted photos of it! :o)

Don't you just love the bags under the shelf...that's my hospital bag, diaper bag and then the carseat base that needs to be put in the car...lined up, all ready to go!I already love the wipe warmer...it makes the whole room smell like baby!!!


Here are some close-ups of the items in the bookshelf:

It is never too early to start reading!Thanks GG for the darling sign and Uncle Todd for the sweet, stuffed monkey...the childhood essential...according to Uncle Todd! :o)

Monday, February 22, 2010

Operation Nursery: Picture Frames

Here is a recent project that I finished for Landry's nursery and I have to say that I think it is my favorite...maybe it is just the hormones but I am a bit emotional just thinking about what this project is going to showcase in the years to come!
As I have been adding all of the finishing touches to Landry's room I have known that I wanted to get some picture frames that I could use to display photos of my little man as he grows. I remembered that I had a load of picture frames left over from our wedding. Here is one of them: Clearly the frame is black...one of my favorite colors...but I have made a pact with myself to avoid using black in Landry's room so...here comes the spray paint...about $3 at Lowes.
I took the backs and glass off of the frames, laid them out on some cardboard in the garage and started painting.
I decided that I wanted to matte my photos with fabric scraps from Landry's bedding. So, here is what I did. I took the back of the frame...you know, the part with the little stand-thingy on it...and ran a strip of hot glue around the edge. Then I covered it with the fabric scraps.
Not the best pictures but hopefully you can understand what I did..
After the fabric was glued on I trimmed up the edges.
The idea with my frames is that I can easily pull out the pictures and trade them for new ones as Landry grows. Obviously we do not have photos of him yet...and I didn't want to place empty frames in his room...so , I used his last ultra-sound photos. I simply used double-sided tape to place the photos on the fabric covered backs and then put the frames back together. Here are all three frames:
Here is Landry all curled up in mommy's tummy...
His adorable profile...not that I am biased or anything...
And one of our favorites...the "thumbs up" letting us know that everything is going great!
So, there you have it. Sweet, simple, easy to change photo frames! Instead of fabric you could always do the same idea with scrapbook paper, wallpaper, wrapping paper...the possibilities are endless!

Thursday, February 18, 2010

Operation Nursery: Window Treatment and Pillows

I know that I am a bit late in posting these two projects...I think that is going to be a part of my "new life" as a parent! :o)
Here are two pillows that I made for the chair in Landry's room. For the larger pillow all I did was take an existing pillow I was no longer using and recovered it...basically made a new cover and sewed it right on over the old cover! As you can see I used the same fabrics that are on the the crib bumper. I decided to do all "rough" seams...meaning that the raw edge of the seams is on the outside...instead of the inside. I like the fact that it gives the pillow and chair a bit of a "rough and tumble feel"...something I am sure this room is going to experience a lot of!
With the smaller pillow I was able to pick up a pillow form at JoAnn's on sale...$4! Again, I used the fabric left over from his bedding. I cut-out the "L" and ironed on some thin, double-sided fusing, then ironed it onto the pillow cover. Since the fabric was left over from his bumper...the only thing I had to buy was one pillow form...two coordinating pillows...one monogram...$4...LOVE IT!!!! This next project is one that I have had done for about a month now...I know, I know...I am a blog slacker...sorry! You are going to die when I tell you that the window treatment is made from foam board...yes, that's right...foam board! I had seen this idea on one of my favorite blogs, Design Dazzle...you can find the link on the sidebar. The idea was that instead of using wood to make a cornice box...use good old foam board. So, being a thrifty girl...and more importantly...no experience with a saw...and of course being too impatient to wait for help from my husband...I decided to go for the foam.
I bought two pieces of foam board from Michael's...on sale for a total of $7. Sorry...I forgot to take pictures while I was working...so you'll have to bare with me...is that the right form of "bare"...hmmmm? Anyway, I cut both boards in half. Now here's the best part...and when I say best...I really mean hoakiest part...I busted out the clear packing tape and taped together two of the half cut pieces. Oh ya, taped them together...I can feel Martha Stewart cringing now! Then I cut to small pieces to tape to both ends that formed the "L" bracket to attach the cornice to the wall bracket.
Once it was all taped together, I covered it in batting and fabric, securing it with my trusty old staple gun on the back side of the cornice box. Here is my very sophisticated, professional, high quality, window treatment!

Notice the lamp shade? That is a plain, white lamp shade from Target that I covered with some fabric and trimmed with grosgrain ribbon. Now, I just need to a picture of my little man to put on the table!

Monday, January 18, 2010

Operation Nursery: Wall Art

Well, it has been awhile since I have updated you on the nursery. Obviously, my vacation ended and it was back to work for me. So, unfortunately I haven't had the amount of time to focus on the nursery...but don't worry...I find the time to get a few things done! :o)
My latest accomplishment was creating some wall art for Landry's wall, above his changing table. It was super simple, inexpensive and I love the results.
I must confess that this project was a bit frustrating for awhile. I knew that I wanted to use the fabrics from Landry's bedding to mimic the squares on his wall. I also really wanted to add words of inspiration...here was my dilemma...what should the art say?
I wanted the words to represent my hopes and dreams for this little man that we are bringing into the world but at the same time I wanted them to be well suited for a little boy's room...a room that my little man is going to spend a lot of time in. So, of course I asked Chad for his input. Oh how I love my husband...he cracks me up...his response, "Can't you put on there, 'graduate high school, graduate college, and get a job'?" Let me just say that he was DEAD serious. Although these are great goals...and definitely things that I know our son will accomplish, I was looking for words that were a bit more whimsical without being "girlie." So, here is what I decided on:


Hopefully they will represent all of the things that I hope my little man experiences in his life. Like I said earlier, the project was very simple. I bought artist canvases from Michael's. Then I covered them in the fabric from his bedding using my handy-dandy staple gun. Next I took some satin ribbon and stapled it on as well. Finally I glued on the chipboard letters that I bought at Michael's. Voila!