Showing posts with label house. Show all posts

Sunday, February 12, 2012

Table, toy storage...or FORT?

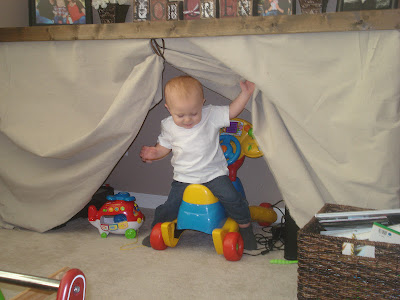
Last month I shared with you how my friend and I made a table to help hide some of Landry's toys. Well, Landry has once again shown us that he has his own idea of how things should be used! Come to find out...the table also makes a perfect...FORT!!!
He loves to play on his toys, under the table, behind the skirt!

"Hi Mom!"

"Were you looking for me?"

Monday, January 16, 2012

My "Mystery Spot!"

Do you have a spot in your house that is a "mystery spot?" You know...a place that you don't really know what to do with. An alcove.A "cubby". Anywhere? Well, I do did.

In our family room we have this area that is kind of like an alcove. It is next to the fireplace on the main wall of the room. In the model of our house the builder had this fabulous built in cabinet...don't they always...and for some reason, it wasn't even an upgrade option. When we moved in I had every intention on contacting the cabinet company to see how much it would be for them to put one in our home. Fast forward to 6 months later, after 3 attempts to have the cabinet company fix damaged cabinets that were put in our brand new home...yes...2 times I had a guy come out with doors that were MORE damaged than the ones that were already in my home...needless to say...I was NOT going to give them any more of my business.

I had looked all over for a piece of furniture to put in the spot...kind of like a buffet or table...but the area is so long that anything that was large enough would have cost us our first born child. Then enter...our first born child and the 6,786,453 toys that came along with him. Needless to say the room went from family room to "Toys R Us threw up every musical, light up, dancing, singing, larger than life toy that ever was made" room. Now don't get me wrong. I am not one of those people who wants my house to look like there is no sign of a child anywhere around. I would just like to be able to have people over without having to look at the musical table, Disney electrical parade car, rocking frog, etc. ***As a disclaimer...I am in no way complaining about these toys. Landry loves them and so do we...so hopefully I am not offending anyone. :o)***

So the task of finding something to take up this "mystery spot" became even more complex. Now I needed something that would fill up the space, go with the flow and decor of the room, store/hide 5 billion toys...while allowing them to be easily accessible to Handsome...and something that would stand up to the beating my child and future children might give it.

Enter this desk!
My blog stalking ended up giving me the perfect solution for my problem. Traci at Beneath My Heart...her link is on my side bar...made this desk for her office. I loved it!

So, one night when my hubby was at a 49er game with his friends, I called my friend Sheri...who is a super talented furniture maker/refinisher...we loaded Landry in the car and headed off to Lowes. I don't have any pictures of us building the table because I thought Sheri would make fun of me for taking them so that I could blog about it. :o) We had Lowes cut the wood for us and then we came home and within 2 hours the table was built and in my family room!!!! AH-MAZ-ING!!!!

Here it is...

We used
3 - 2x6 inch boards for the top,
2 - 1x2 inch boards for the side edges, and
2 - 2x4 inch boards for the legs.

Here is a picture of the top:
I already had a painter's drop cloth on hand. I didn't really want the ruffled look of Traci's skirt so I made mine with a simple inverted pleat instead. I should also mention that I did not stable the skirt to a separate board like she did...nope...I just hot glued it to the bottom of the table! Yup...that's how I roll people. :o)

Since Landry's toys are underneath it, I attached a ribbon behind the skirt. This way, when he is playing, I can pull the skirt up and he has access to all of his toys.
**Sorry for the blurry picture...not too sure what happened there! :o)**

So there you have it! My table/storage area that is the perfect solution for my "mystery spot." Oh...and did I tell you how much it cost? This is the best part. Are you ready?

$40

Yes, you are reading that correctly...$40! For the same cost as a mani/pedi...my friend and I built a piece of furniture that hides most of Handsome's 10 billion toys, fills in my "mystery spot"...and another bonus...it provides me with the perfect spot to decorate for the holidays!

Here are a few more shots of my table:


I had to add this last one so that I could show off the adorable gift my sister got me for Christmas! Love it!

 For the tutorial on how Traci at Beneath My Heart made her desk, click here. Yes, it takes you to the Shanty 2 Chic blog...which is another great place to find tutorials on DIY projects.

***Did you notice that Landry's toys multiplied while I was typing this post? If you have a child...you know it is true!

Sunday, August 15, 2010

Summer Project

So, the summer has basically come to an end...and I have only finished ONE of my projects. Yup, just ONE ...hmmm...I wonder what I have been spending my time doing? I have to say though, that this was a very fast and easy project...and I love the way it turned out. So who cares if it is the only thing I can cross off the ol' project list.

If you are like me you have a ton of earrings, bracelets and necklaces that end up...well, EVERYWHERE. The nightstand, bathroom counter, bottom of the purse - or diaper bag these days, kitchen counter, end table, car console, and the list goes on and on. Not only does this cause clutter, but it also results in lost jewelry. So, I decided to put an end to the madness.

I started with a regular painter's canvas... happened to have an extra one laying around. You could also use foam board, regular wood, etc. I kept some of the extra fabric from when I re-fabbed our comforter so I cut a rectangle out that was slightly larger than the canvas. Next, I laid the canvas over the fabric, wrapped the fabric around the edges and stapeled it down with my handy-dandy staple gun.
The next thing I did was grab some ribbon that would coordinate with the colors in our bedroom. So, I grabbed some sheer gold, brown grosgrain, and a fun, sheer cheetah print. No, I do not have cheetah print in my bedroom...but the colors worked perfectly...and it did inspire me to possibly add some cheetah throw pillows. I wrapped the ribbon around the front of the canvas and stapeled both ends on the back side. In order to hang my creation on the wall, I cut a small strip of ribbon and stapeled it on the top. Here is the view of the back:

Voila! Here is the final product...pretty cute huh?

I used the top two rows to hang my earrings and the bottom row to hang my necklaces. If you are wondering...yes, I did hang them in order of color...you do know I'm OCD...right? Since the ribbon is loose in the front you hang your earrings right on them. Also, if you have post earrings you can pin them right through the ribbon.


Here is a close up view: I hung this on the wall behind our bedroom door. I love the fact that it is hidden when the door is open, so that visitors can't see it, but when the door is closed it is completely accessible. Hopefully this will help me keep my jewelry all in one location, nice, neat, and organized.
Oh ya...I forgot to show you the project I have been working on this summer...

best project EVER!!!!! Love him so much I could just scream! :o)

Tuesday, July 28, 2009

Sew Excited!

Drum roll please...I know its a bit dramatic but doesn't it make the story already seem more exciting because it has a drum roll?...here is some info on the duvet I made.

It all started when the comforter set I just bought a little over a year ago started to fall apart. Yup, that's right...$250 comforter set from none other than Linens-N-Things...falling apart. Literally, the fabric was just pulling away from itself, not at the seams, not that the cats had tore it, just falling apart. So, first I was beyond annoyed and then I was sad. Sad because I REALLY loved the set. It was a beautiful chocolate brown with the ice blue color. Beautiful embroidery, cool pillows and shams...and I really didn't want to get a new one.

So, I hit the internet running. I searched everywhere for something that was affordable and that I loved and thought Chad could handle...result...nothing of course. Then it hit me...why don't I just make my own duvet? Hmm...now there's an idea. FABULOUS I thought...I can make one that will meet my standards and it will be one of a kind.

Here is what I knew I wanted...my "old" comforter's kind of intricate styling, something that would be durable and easy to clean, something that was soft but not super girlie, something that would coordinate with all of the pillows, sheets, and towels that I already have...so what was I going to do? Well, you'll just have to see...ha ha...teaser I know! :o)

I knew in my mind what I wanted to do. Our old comforter had this band on embroidery. I wanted to make a white duvet, cut out the embroidered band and sew it on to the new white duvet. My problem was trying to figure out how I was going to make the duvet...where was I going to get fabric 108 inches wide...oh ya, did I forget to mention that our bed is a Cal King? I was practically making a circus tent! Lovely...I know. So, back to my problem, I didn't really want a seam down the middle so I wasn't sure what I was going to do. Then it hit me while I was in the shower...yes, that is where I do all of my great thinking...SHEETS!
Sheets, you may say...I thought she was making a duvet? That rhymes...I tell you I crack myself up sometimes! Yes, I did make a duvet. Here is what I did. I went to Target...my sanctuary...and bought two king flat sheets, and a down comforter...all for under $50...amazing I know! Then I sewed the two sheets together like a big giant pillowcase. Next, I cut the embroidery band from the old comforter and get this...I velcroed it to the white duvet. Why velcro? Well, here is why I wanted white...I wanted to be able to throw the duvet in the wash, bleach it and know that it was squeaky clean. How could I bleach something to squeaky cleandom if it had color embroidery on it...well, I couldn't. So, I decided to velcro it, so that when it needs to be washed, I can take off the band, wash the duvet and away we go. Not only that...but, if I get sick of the band...never...I can always switch it out with something else. FABULOUS! So, here are some pics...sorry I don't have step by step ones...I got so excited and carried away that I forgot to take some!
Here is what I started with...no, this is not my bedroom...I wish...just the picture from the website.
Here is my final result...I know, compared to the above photo not nearly as exciting but still...it is step one in a list of many!
Detailed view of the embroidery band that I fell in love with! Yup, good ol' velcro works everytime. So, does my new duvet meet all of my specifications?
1. "Old" comforter's intricate styling...check
2. Durable and easy to clean...check, check
3. Soft but not super girlie...check...come on its brown and blue...total boy colors!
4. Coordinate with my pillows, shams, sheets, and towels...check, check, check and check
5. Affordable...big check...total cost...right around $60!
6. Do I love it...LOVE IT!!!!
7. Can Chad handle it...he likes it as well...I think even better than the "old" one.
Now, was that worth a drum roll or what?


Sew Happy!

Okay, so I know that most of you know that I have only known how to sew for about 6 months...totally a rookie. And you probably also know that it has kind of taken over my life...I mean I don't need rehab or anything...well, maybe...is denial the first step to recovery? Hmm...anyway, all I know is that it is keeping me busy and the projects just keep flowing. So, this week I just finished up two major home projects...drapes and, oh yes, the rumors are true...a duvet! I know, aren't you so excited...I am SUPER excited about them!

Well, I started the drapes a while back...and when I mean start, I mean I searched for fabric. As is typical with me, I saw what I wanted but just couldn't find it. After many days searching the good ol' world wide web I found it! Black Damask by Michael Miller...FABULOUS! So, then I ordered and yup, you guessed it...it sat in my "studio" that's what I call my sewing room...doesn't "studio" have a much better ring to it? Anyway, it sat in my "studio" for a few months. Finally, I had the rods, clips, fabric, etc...but was working on getting my hubby to put the rods up so that I could finish these bad boys up.


Here they are, finished and hanging in all of their fabulous glory! I made a total of four panels...I still need to do a cornice box for over the sliding door and then something for a window in our kitchen that is on the same wall as the dining area. Hmmm....

Here is the family room area...sorry it is kinda dark
And the dining area...


Close up of the family room and dining area

So, what do you think?

Tuesday, July 14, 2009

A Week Full of Whimsy!

Isn't it funny how things can be going along, kind of calm, and then all of a sudden it is crazy? Well, I can't say that things are totally crazy...trust me it could get so much worse...but this past week I have been quite busy with my "whimsy" venture. Strangers are actually buying my dresses...crazy, right? The Etsy orders keep on coming. Even though I love to make things for those I have never met, I really enjoy making something special for those I love and care about. So, when my sweet friend Erin asked me to make some gifts for her friends I was so excited. Here's what she designed and I created:Perfect for the future "Executive!"Gotta love anything personalized! And...the "piece de resistance"...say it out loud...it really adds to the story...I promise!Seriously, is this not precious! Erin, I love your ideas and thank you for letting me create this. Total side note...a word to anyone associated with JoAnn's...what is the deal with you not carrying every fabric I fall in love with? Yup, you heard it right...three times in the past couple of months I have purchased some fabric, fallen in love with it...and then, when I need more...it is no where to be found...ANNOYED!
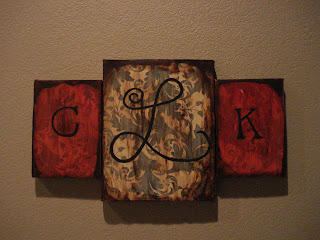
Now, on a totally different note...check out my home project. I am in love with it! So, my long lost friend, Carrie...check out her blog All Things Llanos on the sidebar...is always doing amazing home projects. She also has some cool links to other blogs that she says she "stalks"...which I love...and I myself have found myself "stalking" her "stalked" blogs. So, one of my favorites, Thrifty Decor Chick, had a project she had done in her home with wooden squares and scrapbooking paper. Well, I took the idea, twisted it a bit, gave it my name...literally...and I love it. It is three artists canvases that I bought at Michaels. Then used Modge Podge and paint to"glue" damask printed scrapbook paper on top. After a few coats of paint and Modge Podge, a few dark brown accents to give it a bit of an aged feel, and some black paint, I have this really cool monogrammed wall decor to hang in my entry way. How cool is that? And the best part...it only cost about $15...yay for that!!!