Showing posts with label projects. Show all posts

Sunday, February 12, 2012

Table, toy storage...or FORT?

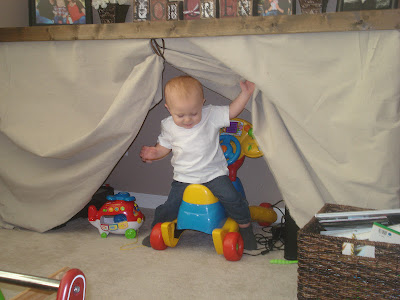
Last month I shared with you how my friend and I made a table to help hide some of Landry's toys. Well, Landry has once again shown us that he has his own idea of how things should be used! Come to find out...the table also makes a perfect...FORT!!!
He loves to play on his toys, under the table, behind the skirt!

"Hi Mom!"

"Were you looking for me?"

Monday, January 16, 2012

My "Mystery Spot!"

Do you have a spot in your house that is a "mystery spot?" You know...a place that you don't really know what to do with. An alcove.A "cubby". Anywhere? Well, I do did.

In our family room we have this area that is kind of like an alcove. It is next to the fireplace on the main wall of the room. In the model of our house the builder had this fabulous built in cabinet...don't they always...and for some reason, it wasn't even an upgrade option. When we moved in I had every intention on contacting the cabinet company to see how much it would be for them to put one in our home. Fast forward to 6 months later, after 3 attempts to have the cabinet company fix damaged cabinets that were put in our brand new home...yes...2 times I had a guy come out with doors that were MORE damaged than the ones that were already in my home...needless to say...I was NOT going to give them any more of my business.

I had looked all over for a piece of furniture to put in the spot...kind of like a buffet or table...but the area is so long that anything that was large enough would have cost us our first born child. Then enter...our first born child and the 6,786,453 toys that came along with him. Needless to say the room went from family room to "Toys R Us threw up every musical, light up, dancing, singing, larger than life toy that ever was made" room. Now don't get me wrong. I am not one of those people who wants my house to look like there is no sign of a child anywhere around. I would just like to be able to have people over without having to look at the musical table, Disney electrical parade car, rocking frog, etc. ***As a disclaimer...I am in no way complaining about these toys. Landry loves them and so do we...so hopefully I am not offending anyone. :o)***

So the task of finding something to take up this "mystery spot" became even more complex. Now I needed something that would fill up the space, go with the flow and decor of the room, store/hide 5 billion toys...while allowing them to be easily accessible to Handsome...and something that would stand up to the beating my child and future children might give it.

Enter this desk!
My blog stalking ended up giving me the perfect solution for my problem. Traci at Beneath My Heart...her link is on my side bar...made this desk for her office. I loved it!

So, one night when my hubby was at a 49er game with his friends, I called my friend Sheri...who is a super talented furniture maker/refinisher...we loaded Landry in the car and headed off to Lowes. I don't have any pictures of us building the table because I thought Sheri would make fun of me for taking them so that I could blog about it. :o) We had Lowes cut the wood for us and then we came home and within 2 hours the table was built and in my family room!!!! AH-MAZ-ING!!!!

Here it is...

We used
3 - 2x6 inch boards for the top,
2 - 1x2 inch boards for the side edges, and
2 - 2x4 inch boards for the legs.

Here is a picture of the top:
I already had a painter's drop cloth on hand. I didn't really want the ruffled look of Traci's skirt so I made mine with a simple inverted pleat instead. I should also mention that I did not stable the skirt to a separate board like she did...nope...I just hot glued it to the bottom of the table! Yup...that's how I roll people. :o)

Since Landry's toys are underneath it, I attached a ribbon behind the skirt. This way, when he is playing, I can pull the skirt up and he has access to all of his toys.
**Sorry for the blurry picture...not too sure what happened there! :o)**

So there you have it! My table/storage area that is the perfect solution for my "mystery spot." Oh...and did I tell you how much it cost? This is the best part. Are you ready?

$40

Yes, you are reading that correctly...$40! For the same cost as a mani/pedi...my friend and I built a piece of furniture that hides most of Handsome's 10 billion toys, fills in my "mystery spot"...and another bonus...it provides me with the perfect spot to decorate for the holidays!

Here are a few more shots of my table:


I had to add this last one so that I could show off the adorable gift my sister got me for Christmas! Love it!

 For the tutorial on how Traci at Beneath My Heart made her desk, click here. Yes, it takes you to the Shanty 2 Chic blog...which is another great place to find tutorials on DIY projects.

***Did you notice that Landry's toys multiplied while I was typing this post? If you have a child...you know it is true!

Tuesday, December 20, 2011

Pantry Redo

So, if you know me at all...you know that I LOVE to organize! When I say love, I mean like madly, deeply, passionately, LOVE to organize. It brings peace to me and there is nothing better than seeing color coordinating bins, labeled, resting nicely on a shelf.

Since my new addiction started...a.k.a. Pinterest...I have been wanting to organize everything in my house. What better time to start than during vacation? Just to let you know how crazy I am...a majority of my vacation "to-do" list is organizing different parts of the house. I am two days in...two projects down! :o)

Here is what my pantry looked like before:

Notice the oatmeal boxes on the floor...I had an "assistant" who wanted to help. :o)

Now, even though I love to organize, I hate to spend a lot of money on bins. I am often torn because the OCD in me so desperately wants everything to match...so many times I end up spending more than I want on matching bins. Well, move aside matching bins...I have a new trick up my sleeve! :o)

Here is what I used:

Yup...banker's boxes! I bought a pack of ten for about $13. Then I decided to paint them black so that they all matched and coordinated with my kitchen...with is red, black, and white. I just poured the craft paint...which I already had...onto a paper plate and used a paint roller to paint the four sides of the boxes. This was so quick and easy...seriously, I had six boxes painted AND dry within 30 minutes!!!!

Then I cut vinyl labels with my Silhouette craft cutter. Two boxes fit on each shelf...but it left a gap in the middle. So, I went and grabbed some empty baby wipe boxes that I was saving for a different project. They were a perfect fit! I decided to cover them with a damask print fabric that I had, added a black vinyl label, and voila!
 I am sooooooooo excited with the way it turned out...and so is my "assistant!"

When I went to take the picture my "assistant" came running over, put his hands on his hips, and then said, "cheese!"

Here is another shot...without the cutie!


Oh...and did I mention that my only expense was the set of boxes? Yup, a whole woppin' $13 people! Everything else I already had on hand!!!!

Sunday, December 6, 2009

Pottery Barn has nothing on me!

So, last weekend I decided to break out the Christmas decor and start working. As I looked around our family room area I was very happy with our tree, mantel, and even the garland on our kitchen cabinets. There was one problem...this: For some reason the big, bare, blank window really bugged me. I had been stalking these wreathes I had seen at Pottery Barn last year. The ones on the gate...love them! I loved the simplicity of the greenery with the sparkle of the ornaments.

Now, I don't want to hate on Pottery Barn because they have so many things that I love...but...the price for these wreathes...take a deep breath...you'll need it...$80 for one 22" wreath. CRAZY...I know. So, knowing that there was no way I could justify spending $80 on a Christmas wreath...which may I add...is decorated with PLASTIC balls...yes, PLASTIC...I decided to make my own version.
I ran down to JoAnns, got a plain wreath...36" on sale for $12...plus I got to use my 15% teacher discount card...LOVE IT! Then I headed to Dollar Tree and bought a whole bunch of red and gold ornaments...shiny ones, matte ones, glittery ones, etc. I will be honest...this project sat in my trunk for oh, about a week...but the important part is...I did it. With the help of my trusty ol' hot glue gun, here is the final result:
And some close up shots of the detail...yes, I like to think I'm some sort of professional! :o)


And...here is what it looks like in my window:


Oh, how I LOVE it!!!! Wondering how it is "magically suspended in the air"...well, with the help of another friend of my...FISHING LINE! Yup when I was finished with my project I shared with my hubby that I was going to hang it in front of the window. His response...he gave me his, suspicious, skeptical, "your aren't going to put a bunch of holes in the wall" look. I said, "Don't worry, Babe. I'm going to use my thick Christmas ribbon, wrap it around the wreath, over the blind valance...and "voila" it will be done." Well, as with many of my "ideas"... that didn't work so well. So, I grabbed the fishing line and it worked...yes, I stood of the back of the couch...4 1/2 months pregnant...to reach the valance...my hubby was gone and you know how patient I am! No worries, I am safe, baby is safe and more importantly...THE WREATH IS HUNG AND BEAUTIFUL!!!!
So, the point of the story...Pottery Barn wreath...$80...Kristin Lofgren wreath...$20...and did I mention that my wreath is 14" bigger!!!